Wednesday, September 24, 2008

VMware Server 2.0 is out

Let's celebrate it! VMware just released a next major version of their VMware Server. Quickly, let's go through the new features and other changes:
  • New operating systems support - it supports operating systems recently released like Windows Server 2008, Windows Vista or RHEL5 .
  • 64b operating system support - finally, we have stable support of 64b guests on 64b hardware. VMware Server runs natively on 64b Linux host operating systems now. Perfect job guys!
  • Virtual machines scalability - you can configure your virtual machines with up to 8GB of RAM and with up to 10 NICs now. The USB2.0 interface is supported as well.
  • Hot add/remove of SCSI disks - you can attach or detach a new virtual disk to the running virtual machine.
  • Virtual Machine Communication Interface (VMCI) - this feature allows to reach better performance in network communication of guests with host or among guests.
  • VI Web Access - this feature allows you to manage your virtual machines from web-based interface. It is part of the installation package now.
  • VMware Remote Console - it is a web browser addon which makes you able to manage your VMs from it. And it allows to connect local CD-ROM as well.
  • Volume Shadow Copy service - you can make consistent backups of Windows guests now with help of VMware VSS writer which uses snapshots to maintain data integrity.
  • Size of installation package - Wow! The installation package has over 500MB of size now! I'm really curious what's inside! The previous version has about 150MB!
I think that VMware enabled every feature which was proposed and implemented in beta release of VMware Server 2.0. I hope I will find some time to install it and check these nice features. By the way, have you installed it already? Download it from vmware.com site, read the release notes.
VCB basic usage - VM mount with mountVm

The full backup of virtual machine vcb-backup was finished and we have its virtual disk available locally now. We can backup it directly or we can access its filesystem and backup selected filesystem structure only (e.g. we want to backup some application data only).

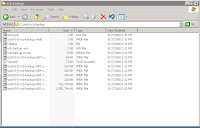
The virtual disk and the whole virtual machine is available in the c:\mnt\vcb-backup\ directory. It contains everything what we might require for its restoration (VMX and VMDK configuration files, NVRAM states and so on). This screenshot figures its content:

The virtual disk path is available from the output of vcbmounter command:
c:\mnt\vcb-backup\scsi0-0-0-vcb-backup.vmdk
To browse the filesystem, we will mount it with the mountvm command:
mountvm -cycleId -d c:\mnt\vcb-backup\scsi0-0-0-vcb-backup.vmdk \
c:\vcb-backup
The successful execution of it will produce messages like these:
Opened disk: c:\mnt\vcb-backup\scsi0-0-0-vcb-backup.vmdk
Proceeding to analyze volumes
Done mounting
Volume 1 mounted at c:\vcb-backup\digits\1 (mbSize=12291 fsType=NTFS )
Volume 1 also mounted on c:\vcb-backup\letters\C
A virtual machine disk represents an image of x86 harddisk with own MBR and partition table. Our disk contains only one partition with NTFS filesystem linked with drive letter C. Each such a letter is mounted under the directory which we specified with -d option (again, the directory is created on demand and it can't exist before). In our scenario, we have c:\vcb-backup\letters.

We are able to traverse the filesystem now and backup its particular files or directories. When we are finished, we will have to unmount it:
mountvm -u c:\vcb-backup
If the mounted filesystem isn't busy, the command will print these messages (otherwise it will end with an error):
Unmounted c:\vcb-backup\digits\1\ (formatted)
Deleted directory c:\vcb-backup\digits\1\
Deleted directory c:\vcb-backup\digits
Deleted directory c:\vcb-backup\letters\C\
Deleted directory c:\vcb-backup\letters
Deleted directory c:\vcb-backup
Finally, let's make a summary of virtual machine full backup steps:
  1. we need to identify the machine (vcbvmname)
  2. we need to export its virtual disk (vcbmounter -t fullvm)
  3. optionally, we might need to mount its filesystem (mountvm)
  4. backup the exported disk
  5. backup the mounted filesystem if mounted
  6. unmount the filesystem if mounted (mountvm -u)
That's all for now. Any question or suggestions are welcome.

Friday, September 19, 2008

VCB basic usage - VM full backup with vcbMounter

Let's choose the virtual machine called vcb-backup and perform its backup. Before we proceed, we should stop to explain that VCB is capable of doing two types of backup:
  1. full backup
  2. file-level backup
The file-level backup is available for Windows operating systems only. The full backup means to backup virtual machine images. You can use it with every type of virtual machine.

Next thing, we need to remember to choose the right transport mode:
  1. SAN mode - bypassing VCB proxy via FC or iSCSI SAN (LAN-free backup)
  2. Hot-Add mode - VCB proxy in a virtual machine
  3. LAN mode - backup over LAN network
In SAN mode, both ESX host and VCB proxy has to have access to the shared storage. The backup is completely offloaded from the ESX host which provides virtual machine disks and their snapshots only. The whole process is moved to the VCB proxy which reads disks directly from the SAN. The Hot-Add mode is interesting in that way, it is able to access virtual machine disks directly but without the SAN. If the VCB proxy is virtualized, it is hot added virtual machine disks. Nothing suprising, VMware ESX is capable of hot-adding disks to a virtual machine. The drawback is that you need to have one virtualized VCB proxy on each ESX host so that it can backup all virtual machines hosted on them. The LAN mode uses network protocols to access the virtual machine disks. By the way, the SAN mode is supported by VCB and VMware ESX natively. The remaining two modes requires VMware ESX(i) 3.5 or later.

The vcbmounter command is used for virtual machine backup. The following command will initiate a full backup of vcb-backup virtual machine in LAN mode:
vcbmounter -h VC_IP -u VC_USER -p VC_PASS -a name:vcb-backup \
-r c:\mnt\vcb-backup -t fullvm -m nbd
The -r parameter defines a directory of backup location. The -m parameter specifies transport mode (available values are san, hotadd, nbd/nbdssl). The directory can't exist. It is created on demand. The command should produce the following output when it finishes:
Copying "[system-raid1] vcb-backup/vcb-backup.vmx":
0%=====================50%=====================100%
**************************************************
Copying "[system-raid1] vcb-backup/vcb-backup.nvram":
0%=====================50%=====================100%
**************************************************
Copying "[system-raid1] vcb-backup//vmware.log":
0%=====================50%=====================100%
**************************************************
Converting "c:\mnt\vcb-backup\scsi0-0-0-vcb-backup.vmdk" (compact file):
0%=====================50%=====================100%
**************************************************

As you can see, the VCB proxy is copying virtual machine disks to the defined local storage. More precisely, the ESX host provides virtual machine snapshots to the VCB proxy which copies them to the local storage (you can check it with snapshot manager - there will be a snapshot called _VCB-BACKUP_). After that, you can backup them with your favorite backup software. Or you can access them with mountvm command.

Wednesday, September 17, 2008

VCB basic usage - VM idetification with vcbVmName

Before we begin the backup process of selected virtual machine, we need to identify it so that VCB can contact VirtualCenter server and start the backup session. This step is simple and requires to run the vcbvmname command. The VirtualCenter server contacts particular ESX hosts and send a list of hosted virtual machines back. Follows the example of command usage:
vcbVmName.exe -h VC_IP -u VC_USER -p VC_PASS -s any:
The most of used command line options are almost common for all VCB commands:
  • -h - hostname or IP address of VirtualCenter server
  • -u - VirtualCenter user who is allowed to do virtual machine backup (at least user with VMware Consolidated Backup User role)
  • -p - VirtualCenter user password
The -s option is more specific and defines virtual machine identifier prefixed with a search pattern. The any: pattern means search for any available virtual machine. This identifier is used by other commands for virtual machine identification as well. It is possible to identify it by IP address, name and so on. What does the above command produce?
Found VM:
moref:vm-99
name:vcb-backup
uuid:5022bd2a-0de0-9c82-e30e-063c976a8a29
ipaddr:132.100.0.29
Found VM:
moref:vm-97
name:vcb-test
uuid:5022ab4a-f7f4-03a2-1434-f2af63938718
ipaddr:132.100.0.28
Here, you can see all virtual machine identifiers - name (name:), IP address (ipaddr:), virtual machine unique identifier (uuid:) and managed object reference (moref:). You can use them as search pattern instead of any: universal pattern. For example, the next command will find the virtual machine with name vcb-test only:
vcbVmName.exe -h VC_IP -u VC_USER -p VC_PASS -s name:vcb-test
Now, we know how to identify the particular machine and next time, we are going to backup it.

Friday, September 12, 2008

What next? VMware ESX 4.0

What next will VMware release after VMware ESX 3.5? This is a natural question and I think it's not surprise that it might be VMware ESX 4.0 or something like this. The surprise is what the next generation of ESX might bring to us. Let's have a look at some of the new features:
  • the service console and the kernel should run in 64-bit mode natively
  • VMware VirtualSMP should support 8 virtual logical processors
  • full support for SATA devices (we might be able to run ESX on PC?)
  • clustered VirtualCenter Servers
  • access control on storage resources
  • automatic configuration changes tracking
  • and many others
The list is not complete. Actually, it contains only a few of prepared features. The details should be unveiled at the incoming VMworld2008 forum as it is written at virtualization.info. I'm looking forward to it.

Thursday, September 11, 2008

VCB basic usage - introduction

Do you know about some useful guide which introduces VCB commands? In my case, I haven't find any yet. I found some articles about the topic which helped me a bit but no one was usable as a reference guide. So, I am still missing such a guide. Unfortunately, the basic usage of VCB commands is comprehensible.

I don't want to write anything advanced for now. Just basics, no SAN, no backup agents. Just to explain what VCB contains. Let's suppose we wanted to export virtual machine disk files or mount them to a Windows station and then to backup it. The backup will run over the network. We need to mount the images, backup them and unmount them after that.

So, which command do we have? Which can help us with the tasks described above? Let's explore them:
  • vcbvmname - connects to the VirtualCenter server and lists the available virtual machines
  • vcbmounter - allows to export/mount the virtual machine disk files to the backup station
  • mountvm - allows to mount the exported virtual machines disk files locally
  • vcbrestore - allows to completely restore the virtual machine disk files to the ESX host
The usage of the commands will be explained in the following article. Now, if you know about any guide focused on VCB usage, please, share it with us.

Monday, September 8, 2008

Microsoft Hyper-V against VMware ESXi again

Hm, the competitor never sleeps, we could say after Microsoft revealed the plan to release Hyper-V Server 2008 platform without Windows (read more at microsoft.com). I'm not able to imagine it but Microsoft developed a minimal version of Windows with the most necessary parts of OS - kernel and drivers - which are loaded in the parent partition. It should be similar to VMware ESXi which is not more dependent on service console. That means the customer doesn't need to invest to the Windows Server 2008 licence. The whole new product should be released within 30 days and it will be free of charge.

By the way, the VMware products are still leaders. And they will be. The stability, performance, central management of virtual environment or enterprise features are more mature than new toys from Microsoft. Let's mention the only one - VMotion technology. It is said Microsoft is going to support live migration of virtual machines in Windows Server 2008 R2 which will not be out before 2010 (details at zdnet.com). I think it's quite late...

Thursday, September 4, 2008

Sun VirtualBox 2.0 is out

Today, Sun released new major version of their desktop virtualization product Sun VirtualBox 2.0. Newly, it supports 64-bit guests (only Windows Vista and RHEL5), Microsoft VHD virtual disk format, AMD RVI or Python API.

It can be downloaded from www.sun.com. The official release notes is available as well.

Wednesday, September 3, 2008

VMware server 1.x and GNOME library issue

If you install VMware server 1.x at your Linux workstation you may encounter the dependency issue between installed VMware libraries and available system libraries like this (lines are broken):
(vmware:30311): libgnomevfs-WARNING **:
Cannot load module `/opt/gnome/lib/gnome-vfs-2.0/modules/libfile.so'
(/usr/lib/vmware/lib/libgcc_s.so.1/libgcc_s.so.1:
version `GCC_4.2.0' not found (required by /usr/lib/libstdc++.so.6))

The above message can be initiated via adding a new virtual disk to the virtual machine or via assigning an ISO image to its virtual CD-ROM. Such operations end with the error displayed in the parent console. The reason why such situation maybe appear is that the installed libraries are compiled with an older GCC compiler than the system libraries. The above error was produced at SLES 10 SP1 distribution which includes GCC 4.1.2. The installed VMware server had version 1.0.6 and in my opinion, it is compiled with GCC 3.x.

The resolution for the problem is to set environment variable VMWARE_USE_SHIPPED_GTK to value "yes", export it and run vmware command after that:
  1. VMWARE_USE_SHIPPED_GTK=yes
  2. export VMWARE_USE_SHIPPED_GTK
  3. vmware &
I recommend to place the variable to your startup script, e.g. to your ~/.profile or ~/.bash_profile.

Monday, September 1, 2008

How to resize ext3 filesystem on RHEL 5.x

I didn't have a luck when I was looking for ext2online utility to resize ext3 filesystem online on RHEL 5.x (it is available on RHEL 4.x). Online means to resize it without requirement to unmount the filesystem. I went through the release notes but I didn't find any notes about it. Perhaps, I didn't read them carefully.

The ext2online tool can be used to resize ext2 filesystem but it has to be unmounted. The tool is able to resize ext3 filesystem online under the condition of kernel supports online resizing. More particularly, it is possible to do online enlarging only.

Alongside it, there exists another tool - resize2fs which is capable of ext2/ext3 filesystem resizing. But the filesystem has to be unmounted first. This is required on RHEL 4.x. If you try to resize a mounted ext3 filesytem on RHEL 4.x with the tool it will end with error "can't resize a mounted filesystem!".

So, how to resize ext3 filesystem on newer RHEL 5.x? Both tools belong to the e2fsprogs package which contains a set of tools for creating, checking, modifying, and correcting ext2/ext3 filesystems. On RHEL 4.x, the package contain both tools - ext2online in version 1.1.8 and resize2fs 1.35. On RHEL 5.x, it contains resize2fs only - version 1.39. The newer version supports online resizing in case of kernel supports it. Here is the summary how to resize ext2/ext3 online on RHEL platform:
  1. RHEL 4.x - use ext2online tool (e2fsprogs package)
  2. RHEL 5.x - use resize2fs tool (e2fsprogs package)
I don't consider necessary to write about these tools usage, it's simple and the tools have related man pages.