During last weeks I found out that I'm looking for a platform which could provide me a simple way how to test clusters and how to learn them in more details. I don't have spare money to buy high-cost hardware featuring high availability and shared storage by default. So I decided to choose another solution which is based on
VMware server (or earlier VMware GSX server).
I don't want to spend many words for introducing VMware server. I suppose that everybody know it as well positioned virtualization technology suitable mainly for developers and testing purposes. The same holds for clustering. I intend to provide a simple way how to deploy high-availability cluster, nothing more. Additional information about VMware server can be found
here and about clustering
here. The documentation is accessible
here.
Let's describe our initial configuration. I assume that VMware server is installed and that we have two virtual machines deployed. It's clear that two machines are the minimum for a cluster and that it doesn't matter if it is a windows or an unix machine. Each machine or better guest operating environment inside it is installed on a standalone virtual disk. Further, it never minds if it is a grow-able/preallocated or IDE/SCSI virtual disk.
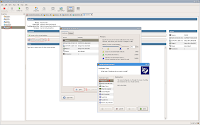
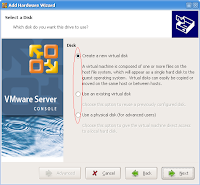
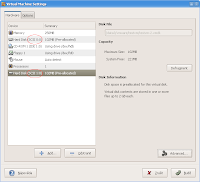
Next, we need to reconfigure the machines and assign them a second virtual disk which we will use as our shared storage later. In fact, we will create only one new virtual disk, but we will assign it twice. So choose any from our two machines, run "edit virtual machine settings" and "add hardware wizard", select "hardware type" to "hard disk" and then follow the wizard. Here, we need to denote the first restrictions which we have to keep in mind during the new disk creation:
- the new hard disk must be a SCSI one because the shared storage is implemented via SCSI reservation protocol
- it should be a SCSI virtual disk with preallocated disk space but the physical disk under it can be of any type (SCSI, SATA, IDE)
- it is possible to work with SCSI physical disk but its support is indicated as experimental so the previous point is the best choice
- the same holds for grow-able virtual disks it's experimental
- it can't be realized via SCSI generic device
- SCSI reservation is bounded to one SCSI bus
- SCSI bus used for shared disk should be different from the bus which is used for connection of system disks that's general recommendation
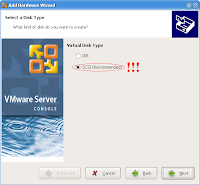
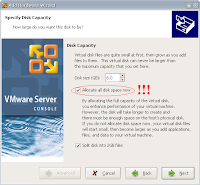
The point 1 and 2 is simple to pass with "add hardware wizard". We don't have to forget to set "virtual disk type" to "SCSI" and to check "allocate all disk space now" from the disk capacity pane. This is valid only for virtual disks. To pass the third restriction we need to edit advanced options of newly created disk so select the disk from "hardware" tab after finishing "edit virtual machine settings". Here we find an important attribute defining the SCSI disk address which is combination of SCSI controller ID and SCSI disk ID. The valid SCSI disk address looks like scsiX:Y where X identifies SCSI controller ID and Y disk ID. Controller ID of the system disk and of a shared disk should vary so if the first virtual disk or the system disk 0 has an address scsi0:0 and we add the second disk 1 which will have the address scsi0:1 we should change it to e.g. scsi1:0. We need to do it because SCSI addressing in VMware server works like that. If the last created disk has ID 10 and it resides on the controller 0, then the next one will have 11. Maximal SCSI ID is 15 and after 15 server will assign next SCSI controller ID that is 1 and will continue from disk ID 0 easily. The maximal SCSI controller ID is 3. Last obvious thing is that a chosen virtual machine have to be powered off otherwise we aren't able to create the new hard disk.
Now, we have a virtual machine with additional disk which is configured according to our restrictions and we need to assign it to the remaining machine. This is quite simple and corresponds with the process of adding new disk like above. The only difference is in the selection of "use an existing virtual disk" during the "add hardware wizard" if the created disk was a virtual disk and not a physical one. Then enter the file path of it and finish the wizard. For virtual machines in a cluster we have a few restrictions as well:
- both virtual machines must reside on the same host. Yes, now you can understand why such solution is suited for testers preferably :-)
- virtual machines support only SCSI-2 reservation protocol and not SCSI-3
The point 1 is evident and it implies from the restriction for SCSI bus boundary. Every SCSI bus is virtualized by VMware server and it is owned by it so it can't be spread over multiple servers. The point 2 is implementation restriction and it seems to be sufficient enough because all major clustering systems (e.g. MSCS, VCS) support SCSI-2 reservation protocol.
Let's continue with enabling SCSI reservation per our virtual machines. This step requires editing their configuration files. The configuration of a virtual machine is represented by a human readable configuration file with ".vmx" suffix. You can locate it with the "configuration file" entry at the summary tab of a virtual machine. The file is well defined and there are many options influencing machine's behaviour. A few of them are related to SCSI reservation so let's take a look at them. The options are disabled by default:
- scsiX.sharedBus = "virtual"
If you want to enable reservation globally per a SCSI bus on controller X, use the first parameter. Then everything or every hard disk attached to the bus will be considered as sharable. If you rather prefer to enable reservation for a selected hard disk only to global reservation choose the second one and the disk with address X:Y will be shared explicitly. If you combine both of them remember that the explicit sharing is not working because it is ignored then (restriction holds on the same bus). I must point out that the first method may be simpler but it is worse manageable. You aren't made to care about which disk on the bus should be shared because every disk will be shared. Further, every line you add to the configuration file of particular virtual machine have to be added to another one as well. The hard disk will be shared by all of them after all.
Enabling reservation isn't everything. Virtual machines are locking their hard disks to prevent concurrent access to them and to cause data corruption. There is a parameter which enable or disable this feature (
it is true by default) and we need it for shared access:
Beware of using it because it holds for every hard disk used by the virtual machine. The result depends on your proper planning and if you are using global SCSI bus sharing or explicit one. If you have configured global reservation then any virtual machine residing on the SCSI bus can possibly access that hard disk and change the data!
The last option is the possibility to redefine the reservation lock file name. The option is optional. It is used when reservation is enabled and it contains the shared state of the reservation of the current disk:
- scsiX:Y.fileName = "your_file_name_of_the_reservation_lock"
The thing is I don't know any useful reason to change it. And if so, it have to be changed on all virtual machines which are the members of the cluster. In conclusion, it will lead to troubles later.
The last thing is very important for keeping your "virtual data" healthy. It is recommended to turn off data caching at the level of virtual machines which are running in a cluster. Otherwise you risk their damage. The following option can achieve it (put the option to all ".vmx" files):
- diskLib.dataCacheMaxSize = “0”
The story is over and next time, I would like to describe particular usage of the previous scenario in some simple clustering environments. We have two virtual machines, they are sharing the virtual disk and we need to take advantage of it by installing some clustering aware software.
